


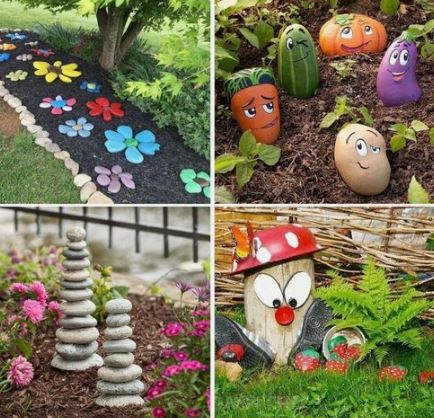
Looking to add a creative touch to your garden? Painted garden rocks are a fun DIY project for you. These rocks can be used as a unique canvas for your artistic ideas.
Whether you want a whimsical, bohemian style or a more elegant look, painting garden rocks lets you show off your personality in your outdoor decor.
Try out painted garden rocks to see how they can enhance your outdoor space!
Key Takeaways
- Acrylic paints make vibrant designs that last long time.
- Different brushes create unique patterns and details.
- Use Sharpie markers to write names or messages for a personal touch.
- Seal your artwork with polyurethane for lasting protection.
- Make colorful garden decor suitable for all ages.
Benefits of Painting Garden Rocks
Painting garden rocks adds color and fun to your outdoor space. It’s an easy way to show off your style and make your garden more interesting. You can use acrylic paints that can handle the weather to create bright designs that won’t fade. Whether you’re good at art or just starting, painting rocks is a cool project for all ages.
The best part about painting garden rocks is that you can make them your own. These painted rocks can be used as special markers for your garden, giving it a personal touch. Plus, it’s a cheap way to decorate your garden without spending a lot of money on store-bought decorations. With a bit of imagination and some basic supplies, you can turn plain rocks into eye-catching pieces of art that will jazz up your garden.
Essential Supplies for Rock Painting
To paint rocks, you need rocks, acrylic paints, paint brushes, Sharpie markers, and polyurethane finish.
Acrylic paints have bright colors and are durable.
Use various paint brushes for different designs and smooth application on rocks.
Rock Painting Tools
Make sure you have rocks, acrylic paints, paint brushes, Sharpie markers, and polyurethane finish for rock painting. Use thick and thin brushes for detailed designs, Sharpie markers for fine lines, and polyurethane finish to protect your artwork.
Wash and dry your rocks before painting. Here are the essential tools for rock painting:
- Rocks: The base for your design
- Acrylic Paints: Bright colors for your art
- Paint Brushes: Thick and thin for details
- Sharpie Markers: For precise lines
- Polyurethane Finish: Protects and extends the life of your artwork
Paint Selection
For better rock art, choose acrylic paints. They come in many bright colors and stick well to rocks, lasting a long time. Get outdoor acrylics for durability.
Use thin and thick paint brushes for details and bold strokes. Sharpies are good for fine lines and writing names.
Protect your painted rocks with polyurethane from the weather.
Step-by-Step Rock Painting Guide
To paint rocks for your garden, the first step is to wash and dry them. Then, gather acrylic paints and various brushes to create bright colors and detailed designs. Once the painting is complete, apply a polyurethane finish to protect the rocks from the weather and ensure they last longer.
This process will not only add a personal touch to your garden but also help preserve the artwork for an extended period of time.
Color Selection Tips
To make your garden rocks colorful and lasting, use acrylic paints. Choose a variety of colors for visually appealing designs. Pick colors that go well with your garden’s colors or try different combinations for unique looks. Follow color theory to create balanced and harmonious palettes.
Use the table below for color selection tips:
- Use a mix of colors
- Match your garden’s colors
- Try out different color combinations
- Follow color theory
- Create harmonious palettes
Rock Painting Techniques
To start, clean your rocks thoroughly before painting them. Acrylic paints work best for vibrant and lasting colors on rocks. Add multiple layers of paint for depth and coverage, letting each layer dry before adding more.
Use a Sharpie marker for precise outlines and text. Seal your finished masterpiece with a polyurethane finish to protect it from the weather and make it last longer.
These techniques will help you bring your creative ideas to life and personalize your garden or home decor.
Creative Rock Painting Techniques
To make your rock paintings better, try using different brush sizes for various effects. Use small brushes for details and large brushes for broader strokes.
Mixing colors on rocks can create interesting effects and make your art more vibrant. Experiment with techniques like dotting, swirling, or stippling to add texture.
You can also use stencils or tape for crisp lines and patterns. Try different finishes like matte, glossy, or metallic, for unique looks.
These techniques will help you improve your painted garden rocks and have fun with your DIY project.
Choosing the Right Rocks for Painting
When picking rocks for painting, choose smooth, flat rocks with a porous surface. This helps the paint stick well. To make your garden look nice, follow these tips:
- Light-colored or neutral rocks work best for painting. They make bright colors stand out.
- Avoid rocks with sharp edges or odd shapes. They’re harder to paint and handle.
- Get rocks in different sizes for a cool and interesting look in your garden.
Adding a Personal Touch to Garden Decor
Add a personal touch to your garden by painting rocks with unique designs. Use bright colors and intricate patterns to show off your style.
These customized rocks can also act as cute markers for your plants and flowers. They’ll add a fun and artistic vibe to your garden that reflects your creativity.
Sealing and Protecting Painted Rocks
If you want your painted rocks to last longer, use a polyurethane finish to protect them. Here are some important tips to seal and safeguard your painted rocks:
- Enhanced Durability: Applying multiple coats of polyurethane finish makes your painted rocks more durable, helping them withstand different weather conditions.
- Proper Drying: Let each coat of polyurethane finish drying completely before applying the next one. This process creates a strong barrier against outdoor elements.
- Protection from Moisture: Polyurethane finish acts as a shield, protecting the paint on your rocks from soil and moisture in your garden. This protection keeps the colors vibrant for a longer time, so you can enjoy your painted rocks for years.
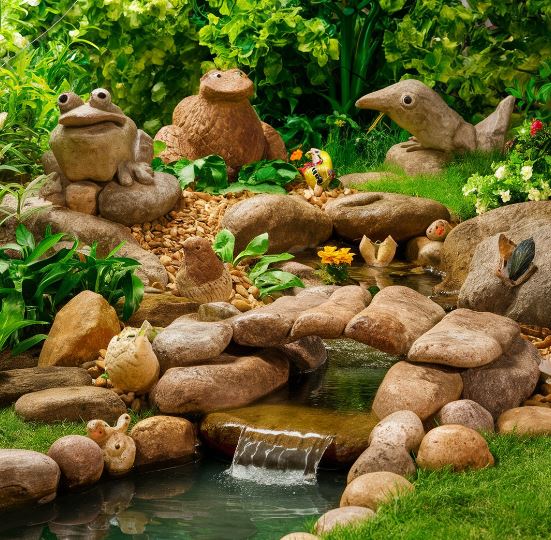
Ideas for Rock Placement in Garden
Placing rocks in your garden can improve its design and function. Use rocks to outline flower beds and paths for structure.
Painted rocks can mark plants or herbs for easy identification and add a fun touch. Arrange painted rocks in circles for a focal point.
In a rock garden, painted rocks can add color and interest. Place painted rocks along garden edges or around trees to create borders.
Be creative with rock placement to enhance both function and beauty in your garden.
Showcasing Your Painted Rock Creations
Here are some simple ways to showcase your painted rocks in your garden:
- Create a Colorful Path: Place your painted rocks along your garden paths to add a fun and colorful touch.
- Decorate Your Flower Beds: Add your painted rocks among the flowers in your beds for a unique and whimsical look.
- Make Plant Markers: Use your painted rocks to label your herbs, flowers, or vegetables for a personalized and colorful way to keep track of your plants.
Frequently Asked Questions
What Can You Do With Painted Rocks?
You can use painted rocks for rock hunting, garden decorations, markers, and DIY projects. They add color and fun to your outdoor space.
What do you use to seal painted rocks?
To protect painted rocks, use a clear polyurethane finish. Apply several coats for strong protection. Let each coat dry before adding more. This sealing method with polyurethane is important for outdoor rocks to keep colors and designs intact.
Do you need to prime rocks before painting?
Yes, you should prime rocks before painting. Priming creates a smooth surface for the paint, helping it stick better and stay on longer. Use a white primer for bright colors. If you skip this step, your paint might chip off easily.
What Kind of Paint Is Best for Rock Painting?
Acrylic paint is the best choice for painting rocks. It’s durable, colorful, and sticks well to rocks. It dries quickly, is waterproof, and is great for detailed designs. You can create depth and texture easily with acrylic paint.
Conclusion
Now that you know how to paint garden rocks, gather your paint supplies, pick the right rocks, use different painting techniques, and protect your creations with a sealant.
Painting garden rocks is a fun DIY project that will add color and charm to your outdoor space. It’s a great way to personalize your garden decor and enjoy your artistic touch for years to come.