


If your brick chimney is crumbling, start by checking for erosion, cracks, and soft spots. Replace damaged bricks with high-quality ones, wetting them before use. Use a tungsten-tipped masonry saw to safely remove damaged bricks. Choose replacements that match in size, color, and texture. Preparing surfaces involves cleaning thoroughly, removing loose mortar, and fixing cracks. Apply mortar evenly, using the proper tools. Rebuild with safety and strength in mind, checking regularly for durability. Finally, fix any remaining cracks, allow time to dry, and consider a chimney cap for protection. Following these steps guarantees a safe and long-lasting chimney.
Assessing the Chimney Damage
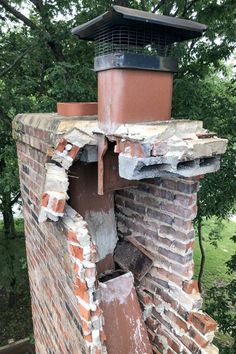
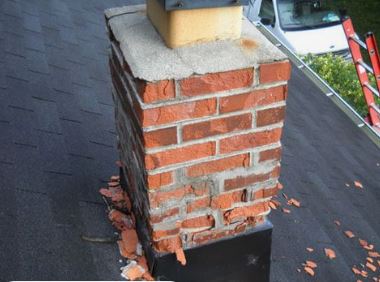
To check the damage to your brick chimney, look for erosion, cracks, and soft spots in the bricks. If you see significant erosion, cracks, or softness, those bricks may need to be replaced. Make sure to assess the extent of the damage accurately for a complete repair.
When replacing the damaged bricks, choose new ones that match the size and look of the originals. Get high-quality replacement bricks from places like H.G. Matthews. Before using the new bricks, wet them to help the mortar stick better for a strong repair. Pay attention to details like flue dividers and frogs to maintain the chimney’s structure and function.
Removing Damaged Bricks Safely
To remove damaged bricks, use a tungsten-tipped masonry saw. Identify soft or cracked bricks and cut the top joint for easy removal.
Follow these steps:
- Check for damaged bricks.
- Wear gloves, goggles, and a mask.
- Clear the area for safety.
Handle the damaged brick carefully. Wet the replacement area for better mortar adhesion. Fill the new brick’s frog with mortar for stability. Use a level for alignment and add pointing mortar for a smooth finish.
Remember to prioritize safety when working with damaged bricks.
Choosing Matching Replacement Bricks
When choosing replacement bricks for your chimney repair, focus on matching the size, color, texture, and frog design of the existing bricks. Consistency in these aspects will help blend the new bricks seamlessly with the old ones.
Make sure to check for any variations in absorption rates or density to ensure stability in the long run. You can consult with a brick supplier or specialist to find the closest match to the original bricks.
It’s a good idea to use sample bricks to compare against the existing ones before making your final decision. Paying attention to these details will help you achieve a professional and cohesive look for your chimney repair.
Preparing Surfaces for Repair
To prepare the brick for repair, clean it well and remove any loose mortar. Fix any cracks and chips in the bricks to make sure the surface is smooth for the repair.
This will create a good base for the new mortar to stick properly.
Clean the Brick
Before starting the repair work, make sure to clean the brick surface well using a wire brush or pressure washer to remove dirt, grime, and loose debris.
If there are tough stains, you can use a mild detergent or brick cleaning solution to get rid of them. Check the surface closely to ensure there’s no leftover mortar, paint, or sealant that could affect how well the repair materials stick.
It’s important for the brick surface to be completely dry before applying the repair materials to avoid any issues with them sticking properly. Cleaning the brick surface properly is crucial for the repair materials to work well and make the chimney repair last longer.
Remove Loose Mortar
Check the chimney for loose mortar. Use a tungsten-tipped masonry saw to carefully remove any loose mortar. Cutting the top joint of the bricks will make it easier to take out the mortar.
Before applying new mortar, make sure to wet the brick surfaces so the new mortar sticks well. Fill the frog (the indented part of the brick) with mortar for extra stability. Use a level to keep the new brick aligned correctly, and smooth out the mortar for a neat finish.
Here’s a simple guide to removing loose mortar:
- Check for loose mortar
- Cut the top joint of bricks
- Wet the brick surfaces
- Fill the frog with mortar
Repair Cracks and Chips
To fix a cracked or chipped chimney, follow these steps:
- Clean the area well using a wire brush.
- Make the crack slightly wider with the wire brush to improve adhesion of the new mortar.
- Apply a bonding agent or primer to enhance the strength of the repair.
- Fill the crack with mortar or repair mix and smooth it out evenly.
- Allow the repair to dry completely before considering painting or sealing for additional protection.
This process will effectively strengthen your chimney and prevent further damage.
Proper Mortar Application Techniques
To fix eroded bricks, spread mortar evenly on them using a hawk and trowel. Press the mortar into the joints firmly for a strong hold. Don’t use too much mortar to avoid spills.
Use a pointing trowel to remove extra mortar for a neat finish. Let the mortar cure properly before bad weather. Keep the mortar application consistent for a uniform look.
Repairing Cracks and Filling Frogs
To keep your brick chimney strong, fix cracks with a lime mortar mix. Cracks weaken the chimney, so fix them right away.
Fill any holes in the bricks with mortar before placing them for a strong base. Use crushed brick to fill cracks for better weather resistance. For small cracks, repair instead of replacing the whole brick to keep the original structure.
Apply the mix well for a lasting fix. These steps will help you repair cracks and holes in your chimney, keeping it strong for years.
Regular maintenance and quick repairs are important to prevent more damage to your chimney.
Rebuilding the Chimney Stack
To rebuild the chimney stack, you’ll need new bricks, mortar, and tools.
Start by securing the corners of the chimney base and ensuring a stable foundation.
Then, build up the stack layer by layer using proper techniques for safety and strength.
Materials Needed for Rebuilding
Steel props are essential for providing support during construction projects. A mortar mix is used to bind bricks or stones together, ensuring structural integrity. A wire brush is handy for cleaning off excess mortar or grime from surfaces. A trowel is a versatile tool for spreading and smoothing mortar or plaster. Safety goggles and gloves are crucial for protecting your eyes and hands from debris and hazards.
Using the right tools and equipment is key to completing a construction project safely and efficiently. It’s important to have a well-stocked toolbox with all the necessary items for the job. By having these tools on hand, you can ensure that your work is of high quality and meets the required safety standards.
Preparing the Chimney Base
To maintain the chimney’s structure, start by replacing the damaged bricks in the base. Carefully remove the old bricks, clean the area, and place the new bricks securely. Use mortar to bond them and fill any gaps for strength.
Follow safety guidelines and monitor progress closely. This will create a strong foundation for further repairs.
Building up the Stack
To rebuild the chimney stack, start by removing damaged bricks carefully. Clean the area well for better brick adhesion. Use mortar to secure the new bricks properly. Make sure the bricks are aligned and level as you build the stack.
Let the mortar cure before using the chimney heavily. Follow these steps to rebuild the chimney stack safely and effectively.
Maintaining Structural Integrity
To keep your old chimney strong, replace worn-out bricks one by one. Start with the corners, then do the middle for stability. Use a special saw to remove bricks carefully. Safety is key for a sturdy rebuild.
Cover the rebuilt chimney with wet cloth to help it set. Here’s a simple guide to help you out:
- Replace old bricks in order to ensure stability.
- Support corners before middle brick work.
- Cover with wet cloth to help it set.
- Use a special saw for brick removal.
Monitoring and Ensuring Safety
To keep your brick chimney repair safe and long-lasting, cover the brickwork with damp hessian during curing. Follow these steps for a secure repair:
- Support corners before replacing middle bricks.
- Replace eroded and broken bricks in order to stabilize the chimney.
- Use proper tools and techniques for rebuilding, focusing on safety and strength.
- Check the rebuilt chimney regularly to ensure durability.
- Watch the curing process closely to avoid cracks or problems.
Final Steps and Maintenance
After fixing the chimney and making sure it’s strong, apply mortar to all the joints for stability. Look for any more cracks and fix them right away. Let the chimney dry for 1-2 days before using it a lot. Get regular check-ups to keep it in good shape.
To protect the chimney, consider adding a chimney cap. This will shield it from bad weather and debris, making it last longer. By following these steps and adding protection, you can keep your chimney safe and working well for a long time.
Frequently Asked Questions
How Do You Fix a Crumbling Brick on a Chimney?
To fix a crumbling brick on a chimney, use a tungsten-tipped saw to carefully remove the damaged bricks. Get matching new bricks and apply mortar on the wet surfaces. Fill the new brick frog, make sure it’s level, and secure it with solid mortar for stability.
Can crumbling bricks be repaired?
Yes, you can fix crumbling bricks by filling the cracks with crushed brick and applying a mix of fine aggregate and lime mortar. It’s best to avoid replacing whole bricks with small cracks to keep the chimney’s original structure intact.
What Causes a Chimney to Crumble?
Chimneys crumble mainly due to water damage, freeze-thaw cycles, and poor construction. Erosion of bricks, mortar, and flashing weakens the structure. Finding the main problem is crucial for fixing it properly.
How Do You Fix a Spalling Brick Chimney?
To fix a spalling brick chimney, use a tungsten-tipped saw to carefully remove damaged bricks. Wet the surfaces before applying mortar for better adhesion. Fill the indentation (frog) in the brick with mortar, and use a level to make sure the new bricks are aligned correctly. Finally, apply pointing mortar between the bricks to keep them stable.
Conclusion
To repair a deteriorating brick chimney, you need to:
- Assess the damage.
- Remove damaged bricks safely.
- Choose matching replacements.
- Apply mortar correctly.
- Rebuild the stack.
- Ensure it’s structurally sound.
Regular maintenance is important for safety and durability. By following these steps and keeping an eye out for any issues, you can restore your chimney and have a safe fireplace for a long time.
Having a structurally sound chimney is crucial for the safety and longevity of your fireplace. Regular maintenance ensures that any issues are addressed promptly, preventing further deterioration. By following the repair steps diligently, you can enjoy a safe and functional chimney for years to come.